EcoMBR1 - Installation
Configure the meter and connect the sensor
Work on the meter and on the power grid may only be carried out by a qualified electrician.
Configure the meter
The sensor talks to the meter with fixed parameters. The meter must be set to the same values:
| Chint DTSU 666 | Orno WE-516/517 | |
|---|---|---|
| Interface | RS485, ModBus RTU | RS485, ModBus RTU |
| Baud rate | 9600 | 9600 |
| Data bits | 8 | 8 |
| Parity | none | even |
| Stop bits | 1 | 1 |
| ModBus address (default on the sensor) | 4 | 1 |
| Factory setting according to the manufacturer | 9600 baud, no parity, 1 stop bit, address 1 | 9600 baud, even parity, 1 stop bit, address 1 |
The ModBus address the sensor queries is set at the factory as in the table. You can change it in the sensor's web interface: entry Meter Modbus Address in the Meter group (1 to 247). The sensor then restarts by itself. This way you can run a meter with a different address without changing anything on the meter. Baud rate, parity and stop bits are fixed.
Chint DTSU 666: The factory setting fits except for the address, which must be changed from 1 to 4 (or you set the address 1 on the sensor instead, see above). This is done with the buttons on the meter:
- Press SET, the display shows
codE. Confirm with SET and enter the password (factory default 701): → counts the digit up, SET moves to the next digit. - Use → to go to the entry
Addr, open it with SET and set 4. - If necessary, set the baud rate (
bAud) to 9.600 and the setting for parity and stop bits ton.1(no parity, 1 stop bit) in the same way. - Leave the menu with ESC.
Some versions are set to the DL/T 645 protocol at the factory. In that case switch to ModBus (n.1) first. The meter also shows protocol, address and baud rate in its normal display.
Orno WE-516/517: The factory setting fits, nothing needs to be changed. If your meter has a different address, set it on the sensor (see above). The meter shows the address (Id) and the baud rate (Bd) when you page through the display. They can only be changed over the RS485 interface with the manufacturer's software.
The details are in the manufacturer's manual.
Connect
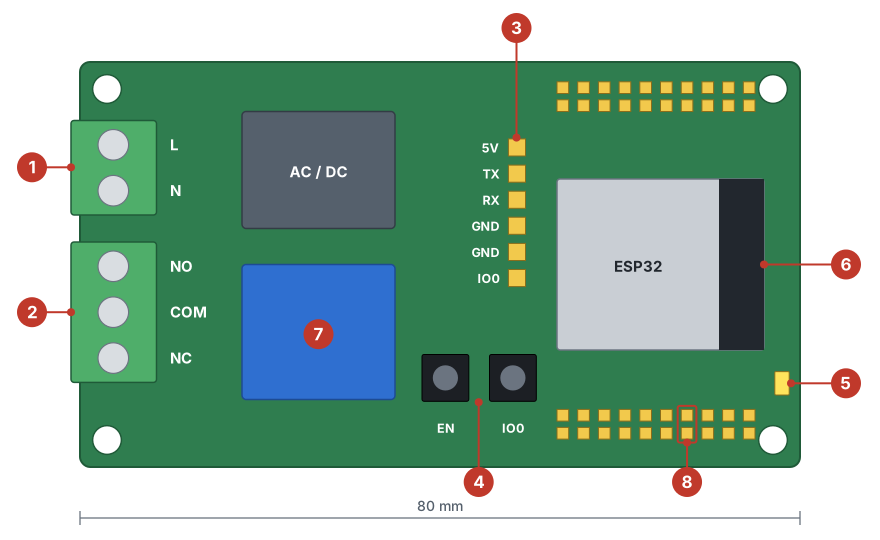
| No. | Connection | Meaning |
|---|---|---|
| 1 | Terminals L / N | Power supply of the sensor, 90–250 V AC |
| 2 | Terminals NO / COM / NC | Relay contact (changeover): COM–NO closes when the relay switches on. COM–NC is closed in the idle state. |
| 3 | Pin header 5V · TX · RX · GND · GND · IO0 | serial interface to which the RS485 converter for the meter is connected |
| 4 | Buttons EN and IO0 | restart and flash mode, not needed in operation. Only to reset the access password is IO0 held for 10 seconds during operation. |
| 5 | Status LED | shows the operating state |
| 6 | ESP32 module | The WiFi antenna sits at the edge of the board and must not be covered with metal. |
| 7 | Relay | switches the contact at terminals 2 |
| 8 | Pin header, pins GND (top) and IO19 (bottom) | switch input for "permanently on". The two pins face each other. |
- Connect the sensor to the meter's RS485 interface: A to A, B to B. On the Chint DTSU 666 these are the terminals 24 (A) and 25 (B), for wires from 0.25 to 1 mm². On the Orno and on differing versions, the marking on the meter applies. Use a twisted pair and route it separately from the mains cables.
- Power the sensor: connect L and N to terminals 1 (90–250 V AC).
- Connect a load to be switched via the relay contact (terminals 2). The contact interrupts one wire of the load, usually between COM and NO. It is rated for at most 10 A at 250 V AC. Switch larger loads through a contactor.
- If needed, connect a switch for "permanently on": between IO19 and GND of the pin header (8). The two pins face each other directly, so a two-pin plug fits across them. The switch only carries extra-low voltage (3.3 V), no resistor is needed. What it does is described under Configure the relay.
If you have no electricity meter, skip step 1.
The board carries mains voltage. Connect the sensor only when it is disconnected from the mains and operate it only in the closed housing.